Pan-Fried Chicken Patties

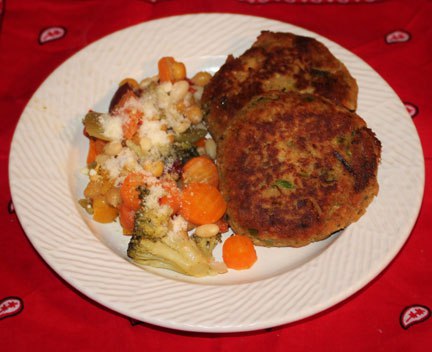
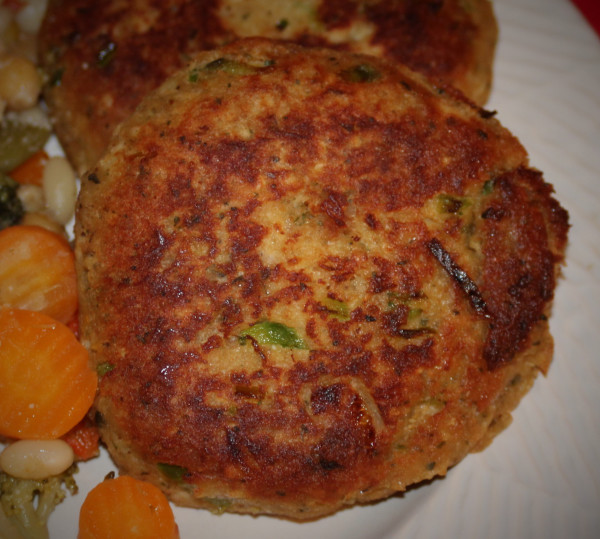
I know the first thing you are going to say when you see this picture – “those look just like the salmon patties my mom used to make” and you wouldn’t be very far off! Of course, the main difference is they are made with canned chicken breast. Now don’t get me wrong, I love me some salmon patties but while salmon has an extraordinary flavor, it is rather strong and the cooking smell lingers.

Chicken is much milder in flavor and aroma and that opens so many avenues for exciting new seasonings and flavor. I tend to use Italian seasonings in a lot of my cooking but there is no reason you can’t try something different – change the flavor of the entire meal by simply switching a few ingredients. Cumin instead of basil, cilantro instead of oregano, black beans instead of steamed squash. You just went from Tuscany to Tucson. Heck, I bet they would be good with a little pineapple and a drizzle of soy sauce. This is a very versatile entrée and gentle on your budget.

So be creative with this and be sure to save your leftovers. These little jewels make a great sandwich the next day.

pan-fried-chicken-patties-close-up

[recipe title=”Pan Fried Chicken Patties” servings=”4″ time=”30 minutes” difficulty=”easy”]

pan-fried-chicken-patties-close-up

Ingredients

  • 1 (15oz) can well drained chicken
  • 1 large egg
  • 2 or 3 tablespoons low-fat mayonnaise
  • 2 tablespoons olive oil divided
  • 2 tablespoons butter
  • 1⁄2 cup finely chopped sweet onions
  • 1⁄2 cup chopped bell pepper
  • 1 tablespoon minced garlic
  • 1⁄4 cup finely chopped celery
  • 1 teaspoon dried basil
  • 1 teaspoon dried oregano
  • 1 teaspoon table salt
  • 1⁄2 teaspoon black pepper
  • 1 1⁄2 cups garlic breadcrumbs

Directions

In a medium saucepan, heat 1 tablespoon olive oil and add onions, bell pepper and garlic. Cook on medium-high for 5 minutes, stirring often. Remove from heat and transfer to a medium mixing bowl. Add 1 tablespoon olive oil, egg, and mayonnaise. Stir well and add remaining ingredients, breadcrumbs last. Add half the breadcrumbs and mix well by hand. Slowly add remaining breadcrumbs and continue mixing by hand until patties formed will hold their shape. Heat butter in saucepan and fry patties on medium high. Flip patties after 5 minutes and cook another 5 minutes. Remove to a paper towel covered plate and allow to drain 5 minutes before serving.

Cooking Notes

The main thing is working in just the right amount of bread crumbs so the patties will hold together. You may need a little more salt & pepper.
[/recipe] Facebooktwitterpinterestlinkedin

Mason Jar Cheesecakes

Nothing says, “I’m just tickled to have you here” better than a delicious dessert presented beautifully. Except maybe cheesecake…oh, wait, this is both! Then, just to make it better, we’re going to cook it in a – wait for it – SLOW COOKER!

OK, we’re all friends here. Let’s just admit it, amongst us – it’s a cult. Cult of the Slow Cooker. We all have one in our kitchen. Some of us hide ours under a cabinet and some of us proudly display ours on the counter with little lid holders and crocheted cozies. We pass recipes back and forth like State secrets and love to have the chance to tell a fan, “Honey, I just put a little of this and a little of that in the slow cooker”.  

When it comes to desserts, I know people who use their slow cookers to turn out some great desserts. Bread pudding and cobblers turn out pretty good but I don’t like to serve from the pot and it’s danged near impossible to turn it out pretty. So I had pretty much given up on slow cooker desserts until I heard you might could make cheesecake in one.

The mason jars are a perfect container for this cheesecake. They cook individually and the serving size is perfect. Make them up, pop them in the slow cooker for a couple hours, then cool, cap and refrigerate. This is a great portable treat for a picnic or a nice end to dinner with friends. They can be made up to 24 hours ahead. Now, is that the perfect dessert or what?

OK, drag out the slow cooker and try this. I promise you will like it and you’ll have a new recipe to pass to the rest of the Cult!

[recipe title=”Mason Jar Cheesecakes” servings=”8″ time=”20 min. prep, 2 hr. cooking” difficulty=”easy”] Cheesecake-Finished2Crust Ingredients

  • 1 pack of 9 graham crackers, finely crushed
  • 1 heaping tablespoon sugar

Filling Ingredients

  • 2 pounds cream cheese, room temperature
  • 1 ¾ cups white sugar
  • ¼ cup corn starch
  • 2 large eggs slightly beaten, room temperature
  • ¾ cup heavy cream or half and half
  • 1 teaspoon pure vanilla extract
  • 1 teaspoon pure almond extract
  • Optional: Fresh fruit, slivered almonds, preserves and/or mini chocolate chips

Equipment

  • 8 half pint Mason jar, rings and lids
  • 7-8 quart oval slow cooker

Directions
Crust: in a small bowl, combine graham cracker crumbs and sugar and stir well with a fork. Put 2 tablespoons of mixture in each of the jars.

Filling: Beat cream cheese on high speed for at least 2 minutes. Stop the mixer, scrape  sides of bowl. Add sugar and corn starch and beat on high for 2 minutes. Stop the mixer, scrape the sides of the bowl . Add eggs and cream or Half & Half and beat on low for 2 minutes. Stop mixer, add extracts and beat on low for 1 minute.

Pour the mixture into your 8 jars **making sure to only fill them ¾ full** (I used a canning funnel to help keep things neat). Cover with lids and screw rings on loosely. Place jars in cold slow cooker. Fill slow cooker with water until it reaches ¾ of the way up the side of your jars. Remove the rings and lids from jars, place lid on slow cooker and set on high for 2 hours.

Remove lid from cooker, turn off  and allow cheese cake to cool for 20 minutes before removing. Allow to completely cool, replace lids and rings and place in refrigerator to chill a minimum of 4 hours or overnight. Garnishing with fresh fruit makes a beautiful dessert for serving.

Cooking Notes: It is very, very important not to overfill, either the jars OR the slow cooker, trust me on this one!! The rings and lids keep the water out of your cheesecake when filling cooker with water.

[/recipe] Facebooktwitterpinterestlinkedin

Artisan Bread

Nothing in this world smells better than bread baking. It’ll wake up a dead man, I swear!

I’ve made a lot of bread, biscuits, cornbread (kinda like Bubba Gump and his shrimp) but when I found this recipe, I hit the jackpot. Low maintenance, freshly baked bread that you could make every day. It is equally good for pasta with some good butter and fresh garlic on it or made into a peanut butter and banana sandwich.

Most yeast breads have to be treated kinda rough. You have to punch it and knead it and shape it. This Artisan Bread takes a gentler hand. You actually want to touch this as little as possible.

Now, I don’t profess to be a food scientist, so I can’t tell you exactly why this bread works so well. I’m sure it’s that long slow rising time mainly and baking it in a dutch oven. All I know is that the end result is delicious and worth the wait.

It’s easy to add seeds, nuts, etc., to this dough. Just add as you are shaping the dough into a ball before baking.

Put some of this together before your mama-in-law comes over next time. I guarantee she will ask you for the recipe.

[recipe title=”Artisan Bread” servings=”8″ time=”15 hours” difficulty=”easy”]

Artisan-bread2

Ingredients

  • 3 ¼ cups all-purpose flour
  • 1 ¼ cups lukewarm water
  • 1 tablespoon salt
  • 1 ½ teaspoon dry yeast

Equipment needed

  • 6-quart Dutch oven

Directions

In a large bowl, stir together the flour, salt, and yeast. Add water and using a wooden spoon, stir together until mixture is shaggy and combined. Cover the bowl with plastic wrap and sit in a warm room for 12-18 hours. Dough will bubble and rise up.

When the dough is ready, preheat oven to 450°. Turn the dough out onto a flat, well-floured surface and with well-floured hands, scoop it together to form into a ball. Do not overwork. Cover with a kitchen towel and allow to rest.

While the dough is resting, place your Dutch oven (lid on) in a preheated oven for 30 minutes. After 30 minutes carefully remove HOT Dutch oven and place dough into it. Replace lid and bake for 30 minutes covered. Remove lid and bake for an additional 15 minutes uncovered. The bread will be a rich golden brown.

*Cooking Notes* Great care should be used handling a HOT Dutch oven (use thick pot-holders). There is no kneading required using this recipe. I like to allow the dough rise about 14 hours.

[/recipe] Facebooktwitterpinterestlinkedin

Penne Rigate

I love the smell of good Italian food cooking. Makes you want to take a big ol’ bite of the air! Putting on a big pot of marinara and smelling it cooking ALL day – well, it don’t get much better than that.

But if you don’t have all day to chop and simmer, you can start out with a good jarred sauce and end up with some pretty good aromas, not to mention a yummy supper. Here are a couple things to look for in a sauce:

  • Turn the jar up to make sure the sauce is thick. You can’t always depend on a label to make that judgement for you.
  • If the product has ingredients added, make sure the one you buy matches the end result you want. Fewer ingredients mean you have more leeway to customize the flavor.

I get good results from Bertolli Sauce. Of course, I end up adding this and that and sometimes simmering it a little so the flavors grab on to each other but for this recipe, I kept it simple.

Now, sausage – buy something good quality and that doesn’t mean it has to be expensive. Many stores have their own brand of sausage that is economical and of good quality. I personally like Publix’s brand of Italian sausage – good flavor and just enough fat to add the flavor to the dish.

You can come home at 5:00 and have this on the table by 5:30. Add a salad and a crusty loaf of bread and you’ve got supper…quick!

[recipe title=”Penne Rigate” servings=”6″ time=”30 minutes” difficulty=”easy”]

Penne-Rigate2

Ingredients

  • Olive Oil
  • 1 lb quality Italian sausage
  • 1 lb Penne Pasta
  • 1 medium sweet onion coarsely chopped
  • 1 green bell pepper coarsely chopped
  • 1 (8oz) container white mushrooms sliced in two
  • 7 cloves of garlic chopped medium to fine
  • 2 medium zucchini sliced ½ inch thick (may also use yellow squash)
  • 1 teaspoon salt
  • 1 teaspoon pepper
  • Cheese for grating on top

Directions

Strip the casing off the sausage, tear into small pieces and place in a large deep sided skillet on medium heat. As the sausage begins to fry you should start to see some grease in the skillet, if not add 1 tablespoon of olive oil. Add onion and allow to cook until onion begins to brown just a little. Reduce heat slightly, add bell peppers and mushrooms (if it looks too dry to cook without burning or sticking, add 1 tablespoon olive oil).

Cook uncovered, stirring occasionally, about 5 minutes. Slightly reduce heat, add garlic and stir. Allow to cook about 5 minutes, stir in marinara, cover and lower to a simmer. This is about the time to cook pasta following label directions.

Add zucchini, stir and allow to simmer 8-10 minutes – NO LONGER. Drain pasta and place in a large serving bowl making a well in the center, add sauce and grate cheese on top before serving.

[/recipe] Facebooktwitterpinterestlinkedin