Delightfully Chocolate Muffins

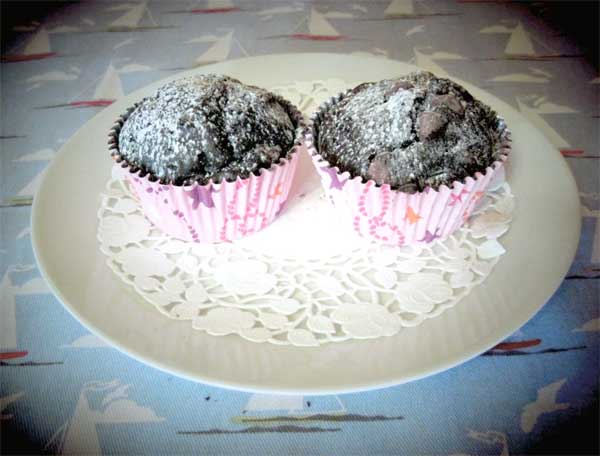
The other night, I had a craving for something a little sweet. Believe it or not, sometimes even in Andy’s kitchen, there is nothing baked. I went into the kitchen and searched through the cabinets to see what might be available. After finding this and that, I came up with this little recipe.

These are not cupcakes – there is no frosting and the texture is muffin-like, not so much cake-like. But with a little sprinkle of confectioner’s sugar, they fit the bill. Sweet but not too sweet and wonderfully moist.

I love cooking with buttermilk. Baked goods end up so much moister and there’s a boost to the flavor that I don’t get with whole milk. I use what I call “full fat” buttermilk. Much of what you find in the stores is lowfat. You have to really search out the whole milk variety and sometimes it costs extra but oh, is it worth it. If you don’t believe me, try this recipe both ways. You will see what a difference that extra fat makes.

Makes a great after school treat or a simple dessert after dinner. You could even have chocolate muffins for breakfast – I won’t tell your mama! Just clean up the crumbs.

[recipe title=”Delightfully Chocolate Muffins” servings=”12″ time=”30 minutes” difficulty=”easy”]
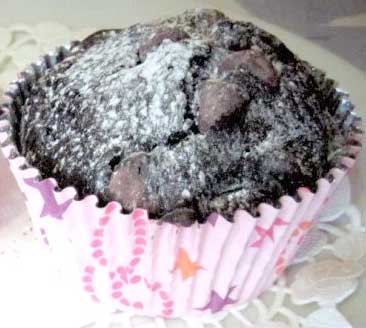
choc-muffin2

Ingredients

  • 1⁄2 cup butter room temperature
  • 2 tablespoons water
  • 3⁄4 cup packed dark brown sugar
  • 1⁄4 cup white sugar
  • 1 cup buttermilk
  • 1 egg
  • 2 teaspoons pure vanilla extract
  • 2 cups all-purpose flour
  • 1 teaspoon baking soda
  • 1⁄2 cup Hershey’s special dark cocoa
  • 1⁄4 teaspoon table salt
  • 3⁄4 cup chocolate chips
  • 3⁄4 cup chopped walnuts

Directions
In a medium bowl combine flour, baking powder, cocoa, and salt. Whisk together well and set aside. In a second large mixing bowl, combine butter, water, both sugars, buttermilk, egg, and vanilla. Using a large spoon,  mix all wet ingredients well. Slowly pour dry mixture into wet mixture and mix just until incorporated. Add chocolate chips and walnuts and mix lightly.

Place foil-lined paper baking cups in a 12-hole regular size muffin pan. Divide batter
evenly between muffin cups. Place pan in a 375° preheated oven and bake 18 to 20 minutes or until a toothpick inserted in the center of a muffin comes out clean. Remove from oven and allow to rest 10 minutes before removing from pan.
*Baking notes*
I used 2 spoons to transfer batter from bowl to baking cup.

[/recipe] Facebooktwitterpinterestlinkedin

Artisan Bread

Nothing in this world smells better than bread baking. It’ll wake up a dead man, I swear!

I’ve made a lot of bread, biscuits, cornbread (kinda like Bubba Gump and his shrimp) but when I found this recipe, I hit the jackpot. Low maintenance, freshly baked bread that you could make every day. It is equally good for pasta with some good butter and fresh garlic on it or made into a peanut butter and banana sandwich.

Most yeast breads have to be treated kinda rough. You have to punch it and knead it and shape it. This Artisan Bread takes a gentler hand. You actually want to touch this as little as possible.

Now, I don’t profess to be a food scientist, so I can’t tell you exactly why this bread works so well. I’m sure it’s that long slow rising time mainly and baking it in a dutch oven. All I know is that the end result is delicious and worth the wait.

It’s easy to add seeds, nuts, etc., to this dough. Just add as you are shaping the dough into a ball before baking.

Put some of this together before your mama-in-law comes over next time. I guarantee she will ask you for the recipe.

[recipe title=”Artisan Bread” servings=”8″ time=”15 hours” difficulty=”easy”]

Artisan-bread2

Ingredients

  • 3 ¼ cups all-purpose flour
  • 1 ¼ cups lukewarm water
  • 1 tablespoon salt
  • 1 ½ teaspoon dry yeast

Equipment needed

  • 6-quart Dutch oven

Directions

In a large bowl, stir together the flour, salt, and yeast. Add water and using a wooden spoon, stir together until mixture is shaggy and combined. Cover the bowl with plastic wrap and sit in a warm room for 12-18 hours. Dough will bubble and rise up.

When the dough is ready, preheat oven to 450°. Turn the dough out onto a flat, well-floured surface and with well-floured hands, scoop it together to form into a ball. Do not overwork. Cover with a kitchen towel and allow to rest.

While the dough is resting, place your Dutch oven (lid on) in a preheated oven for 30 minutes. After 30 minutes carefully remove HOT Dutch oven and place dough into it. Replace lid and bake for 30 minutes covered. Remove lid and bake for an additional 15 minutes uncovered. The bread will be a rich golden brown.

*Cooking Notes* Great care should be used handling a HOT Dutch oven (use thick pot-holders). There is no kneading required using this recipe. I like to allow the dough rise about 14 hours.

[/recipe] Facebooktwitterpinterestlinkedin